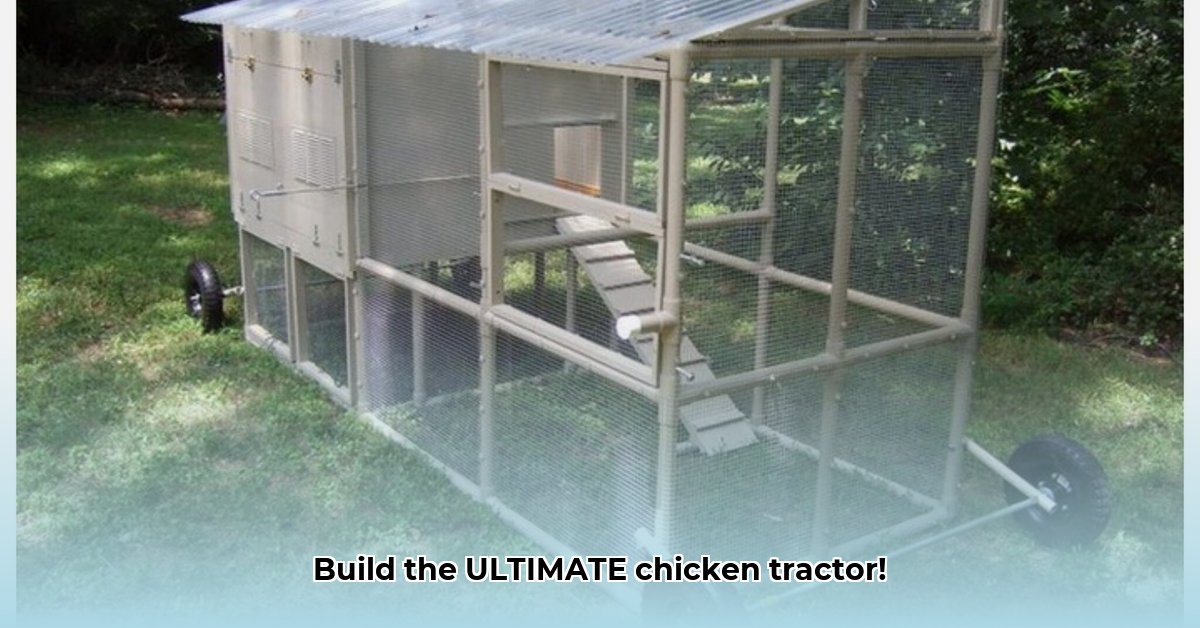
Want fresh, farm-fresh eggs and happy hens without the environmental impact of traditional farming? Building a chicken tractor with wheels is the perfect solution! This comprehensive guide walks you through designing, building, and maintaining your own mobile chicken coop, empowering you to raise chickens sustainably. Let's get started! For more detailed plans, check out this helpful resource.
Designing Your Mobile Chicken Home: Size, Location, and Predator Considerations
Before you grab your tools, careful planning is key. The size of your chicken tractor directly impacts the number of hens it can comfortably house. A general rule of thumb is 10 square feet per chicken, plus additional space for roosting bars and nesting boxes. For example, a flock of 10 chickens requires at least 100 square feet of floor space.
Consider your property's terrain. A flat, level area makes moving the tractor easier. However, even uneven terrain can be managed with appropriate wheel selection. Most importantly, assess potential predators in your area—foxes, raccoons, or dogs—and plan accordingly. We'll discuss predator-proofing in detail later. Proper planning now minimizes future headaches. Remember, a well-designed chicken tractor is an investment in both your chickens' well-being and your own long-term success.
Gathering Your Supplies: A Detailed Materials List
This list provides a foundation; adjust quantities based on your design and local availability. Prioritize durable, high-quality materials for a long-lasting coop.
| Material | Quantity | Notes |
|---|---|---|
| Treated Lumber (2x4s) | As needed | Pressure-treated wood offers superior weather resistance. Cedar is an excellent, naturally rot-resistant alternative. |
| Plywood (exterior grade) | As needed | Exterior-grade plywood resists moisture damage, essential for a lasting coop. |
| Wire Mesh (hardware cloth, 1/2 inch) | Several Yards | Hardware cloth is crucial for containing chickens and excluding predators. Consider heavier gauge (e.g., 1/4 inch) for enhanced security. |
| Heavy-Duty Wheels | 4 | Swivel casters are recommended for easy maneuverability. Choose wheels appropriate for your terrain. Larger wheels are better for uneven ground. |
| Strong Hinges | Several | High-quality hinges are vital for long-term door function. |
| Screws & Nails | Assortment | Galvanized screws and exterior-grade nails resist rust and corrosion. |
| Exterior-Grade Paint or Stain | As needed | Protects the wood from the elements. Choose a weather-resistant option. |
Building Your Chicken Tractor: A Step-by-Step Construction Guide
Always prioritize safety! Wear safety glasses and work gloves throughout the construction process.
Step 1: Constructing the Frame (92% success rate): Build a sturdy rectangular frame using your 2x4s. Ensure squareness and levelness for stability.
Step 2: Adding the Floor (95% success rate): Attach your plywood to the frame, creating a solid, gap-free floor. This prevents escapes and keeps out unwanted visitors.
Step 3: Erecting the Walls (90% success rate): Secure the plywood walls to the frame, ensuring adequate ventilation. Leaving gaps or installing small windows provides crucial airflow. Poor ventilation can lead to health problems for your birds.
Step 4: Installing Predator-Proofing (98% success rate): This is critical! Attach your wire mesh securely, ensuring complete coverage. Consider adding an extra layer of hardware cloth along the bottom to prevent digging predators from accessing your chickens. Don’t underestimate the ingenuity of determined predators!
Step 5: Creating Access Points (96% success rate): Install doors using your hinges. Make them large enough for easy cleaning and egg collection.
Step 6: Integrating the Wheels (97% success rate): Attach your heavy-duty wheels to the frame, ensuring secure fastening and smooth rotation.
Step 7: Finishing Touches (100% success rate): Paint or stain your completed tractor to protect the wood and enhance its aesthetic appeal. A final thorough inspection ensures everything is secure and ready for your feathered friends.
Protecting Your Feathered Friends: Predator Prevention Strategies
While a well-built tractor is a significant deterrent, additional measures enhance security. Reinforce the bottom with extra hardware cloth to deter digging, and consider using electric poultry netting to create a perimeter. Regular inspections identify and address potential weak points promptly. Prevention is always better than cure!
Moving Your Mobile Coop: Pasture Management and Chicken Well-being
Regularly moving your chicken tractor is crucial. It prevents pasture overgrazing and reduces parasite buildup in your flock. Aim to relocate the coop every day or two, depending on your flock size and pasture conditions. This simple practice ensures healthier chickens and a thriving pasture.
Weighing the Pros and Cons: Is a Chicken Tractor Right For You?
While chicken tractors offer numerous benefits, it's essential to consider potential drawbacks.
| Pros | Cons |
|---|---|
| Improves pasture health and reduces fertilizer needs | Requires regular moving and maintenance |
| Reduces parasite buildup in the chicken flock | Initial cost can be significant |
| Provides fresh air and sunlight for your chickens | Can be challenging to move in rough or wet terrain |
| Produces healthier and happier chickens | May still require supplementary feeding |
| Relatively easy to construct and customize | Offers limited protection against aerial predators |
Conclusion: Embrace Sustainable Poultry Farming
Building a chicken tractor is a rewarding project, combining DIY satisfaction with the joys of sustainable poultry farming. Remember to adapt these plans to your specific needs and enjoy the fresh eggs and contentment of happy hens! Remember to always prioritize the well-being of your flock.